Read the whole thing or simply jump to where you want to go:
You Got This
So… you’re the new kid. You’ve decided to join this wonderful world of modern sewists. It’s a little overwhelming, right? It sure was for me.
From the very start, I relied tremendously on blog and YouTube tutorials when I was unsure about a specific skill or technique. And let’s just say I was unsure OFTEN. Luckily, in this day and age, becoming a competent, self-taught sewist is completely doable! I encourage anyone new to the sewing world to be curious, determined, and resourceful… all the answers are out there in this big, wide, interwebbed world.
I’d say one of the most important things is to be patient with the process AND with yourself! You’re more than likely to face thread tension problems, cutting mistakes, confusing patterns, broken needles, bird nests (when your thread gets all bunched up), skipped/uneven stitches, and a fair amount of seam ripping. There may be projects that’ll leave you frustrated and deflated. It’s also safe to assume you’ll compare yourself and your sewing to others and decide you don’t measure up in one way or another. We all do that! Consequently, it may be tempting to stash your machine in the back of the closet and decide sewing isn’t for you. I sure hope you don’t, though. I assure you, it gets easier and more fun as you improve your skills with experience and practice.
Stick to simple, beginner-friendly patterns at first. Be sure to check out Michelle Patterns and Dog Under My Desk when you’re looking for your next project. They both write exceptionally thorough and well-photographed patterns perfect for the beginner.
Of course, I’d love for you to try out my Journal Sleeve pattern which is now available HERE in my new Etsy shop! It’s ideal for the brand new sewist, as well. For more info and loads of Journal Sleeve pics, visit the big announcement.
Regardless of your pattern choice, do yourself a favor and make accuracy your top priority even though it takes more time. You’re more likely to enjoy yourself and you’ll be happier with your finished items (which is the whole point, right?).
I’ve put together a list of a few things you might find helpful if you’re new to sewing. Remember, though, no one resource will be completely comprehensive… that’s why Google is your friend.
Pre-Cut Fabric
Pre-cut fabric bundles are a super fun way to buy fabrics from an entire collection without spending a fortune. Since they’re already cut for you, they can be a tremendous time saver, as well. And they’re just so darn cute! Here are a few of the most common available:
Fat Quarter Bundles: Contains a fat quarter cut of each print (What’s a fat quarter? Keep reading.)
Fat Eighth Bundles: Contains a fat eighth cut (half a fat quarter – 9″ x 22″ OR 11″ x 18″) of each print
Jelly Rolls: 2.5″ x 44″ strips – (40 with duplicates)
Charm Packs: 5″ x 5″ squares (stack of 42 with duplicates)
Layer Cakes: 10″ x 10″ squares (stack of 42 with duplicates)
If you find yourself with one of the above pre-cut bundles and you don’t know what the heck to do with it, do an internet search for projects deemed “friendly” for your particular bundle. For example, search “charm pack friendly” or “charm pack patterns” to find ways to use up your charm packs.
Fat Quarters
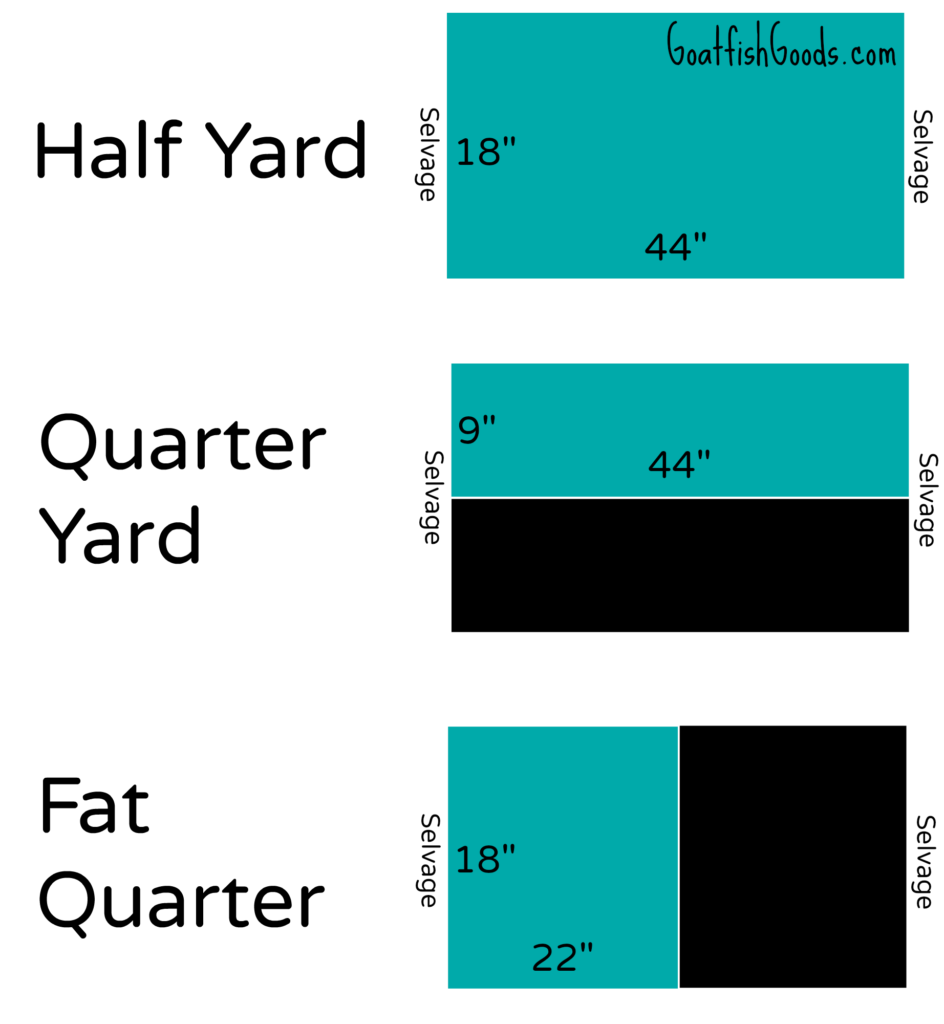
Visit your local quilt shop and you’ll see baskets of little folded pieces of fabric called fat quarters. Their cuteness is so hard to resist! In addition to the appealing price, there are several good reasons to stock up on fat quarters. It’s only one fourth of a yard of fabric, but it’s a nice versatile chunk, as opposed to a long, skinny strip. You’ll see more of your print, especially if it’s a large-scale print, and you also get more fabric along the selvage, which is the finished edge of the fabric that keeps it from unraveling. This length of fabric along the selvage has less stretch and is more desirable to work with.
Fabric off the bolt from selvage to selvage, is typically 44″ wide. So, one yard of fabric would be 36” x 44” making a half-yard cut 18” x 44”. You’ll get a quarter yard cut if you cut this in half along the 18″ side. If you halve it along the 44″ side instead, you end up with a fat quarter. Right, clear as mud! Maybe this diagram will help:
Fabric Cutting
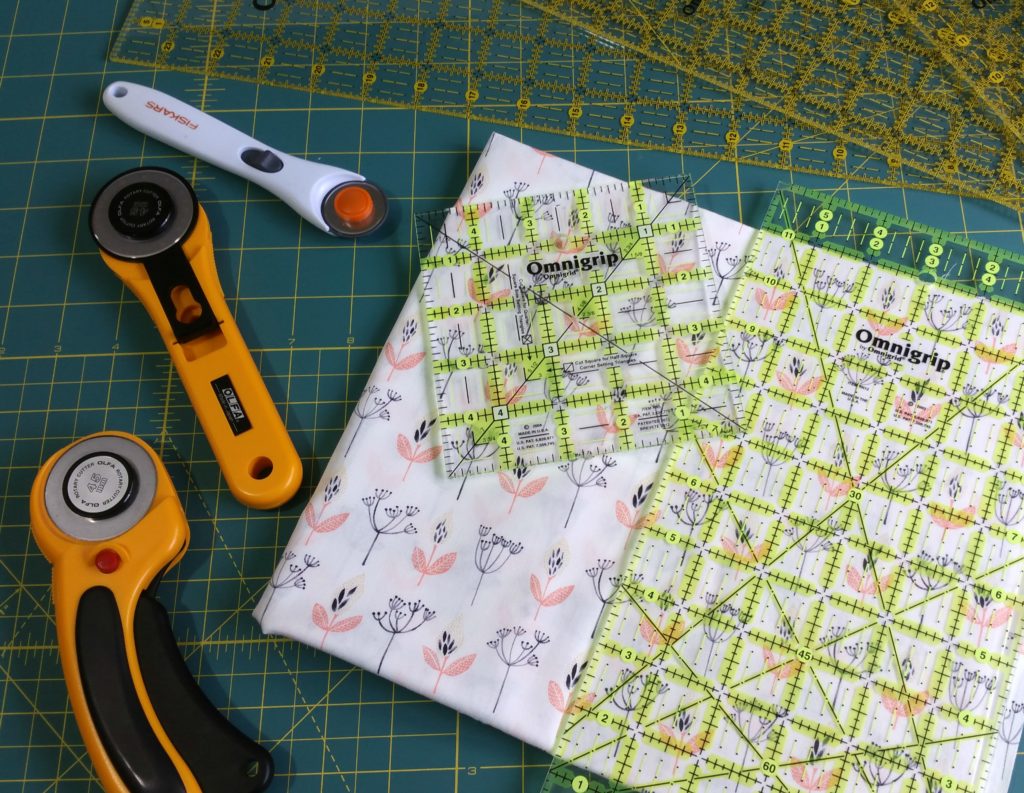
Most often, I use my Olfa 45mm blades. My Fiskars 28mm blade comes in handy, though, when cutting out curved pattern pieces. Some rotary cutters allow you to switch the blades to the right side (like in the pic) if you are left-handed.
Taking the time to make sure your pieces are measured and cut accurately is essential. It’s incredibly frustrating to sew a project when your pieces don’t fit together properly. If you’ve never used a rotary cutter to cut fabric, you’d be amazed by how much more accurate it is than using a pair of scissors. Rotary cutting is also a huge time saver. I firmly believe a rotary cutter, self-healing cutting mat, and a clear non-slip acrylic ruler are must-haves if you plan to sew regularly.
When rotary cutting, learning the technique is important, but it’s probably more important to consider the safety issues. These blades are SHARP! Do your research and practice before you try out your new skills. There are loads of blog and video tutorials out there and, fortunately for southpaws like me, there are even resources for left-handed sewists. And then, once you’re ready to take the plunge and rotary cut your first project, remember to measure TWICE and cut ONCE! We hear this all the time, but it’s a habit with a big pay off.
After you’ve been sewing for a while, it’s likely you’ll branch out with a variety of ruler sizes and cutting mats. You’ll have a better feel by then what works best for the kind of sewing you want to do. My favorite rulers are: 6″ x 24″, 4″ x 14″, and 3.5″ x 3.5″. When it comes to cutting mats, I work daily with a 24″ x 36″, I travel with a 12″ x 18″, and I absolutely LOVE my super cool 13″ x 13″ rotating mat.
Ironing vs. Pressing
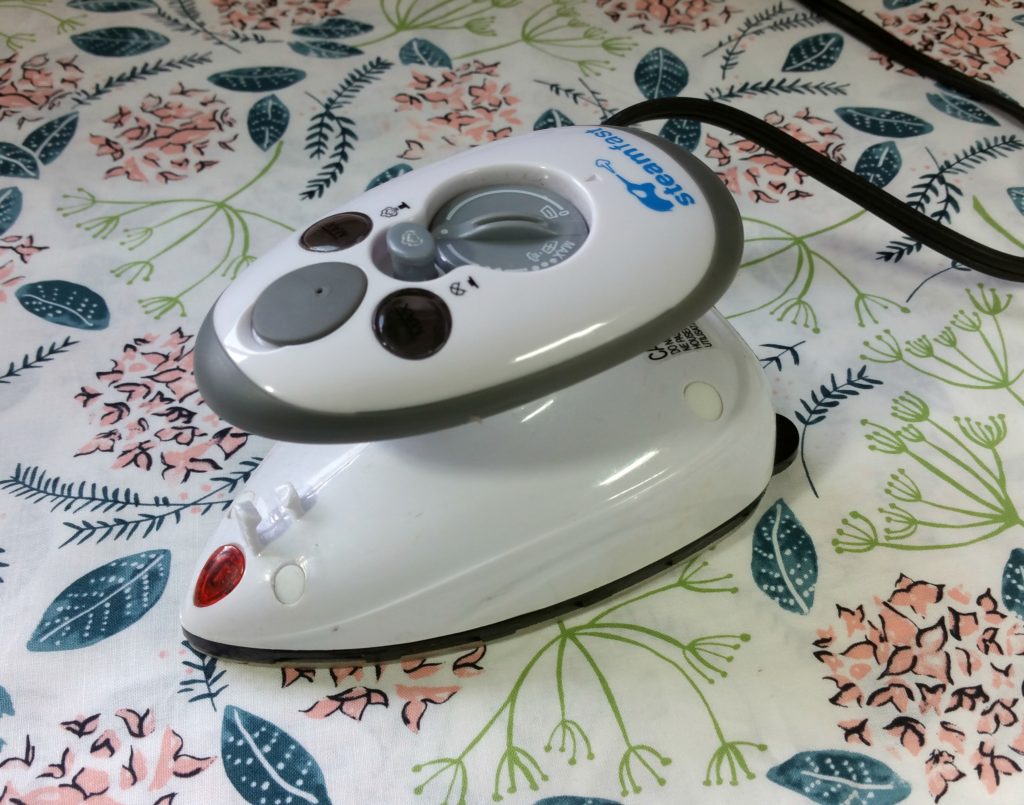
My favorite iron for sewing is the Steamfast SF-717 Home-and-Away Mini Steam Iron.
Ironing clothing has really become a thing of the past for me, but my little iron still gets a daily workout. It’s an absolute essential tool in my sewing arsenal and there are two distinct ways it gets put to use.
When you iron fabric, you move the iron back and forth around your fabric without lifting it. Ironing out wrinkles from your fabric before you begin cutting will ensure your pieces are the proper size. I find Best Press, spray starch, or steam extremely helpful when I have to deal with an especially stubborn crease.
Now, pressing is entirely different than ironing. When you press, you set down the iron onto your fabric, press firmly for a few seconds, and then lift it up again. You do not move the iron around because a back and forth motion can sometimes stretch or distort your fabric pieces. Careful and thorough pressing throughout the construction of your sewing projects is critical if you want a professional looking finish.
So, iron your fabric before you start, press between steps as you work your way through your pattern, and give your project a good final press when you’re all done!
Right vs. Wrong Side of Fabric
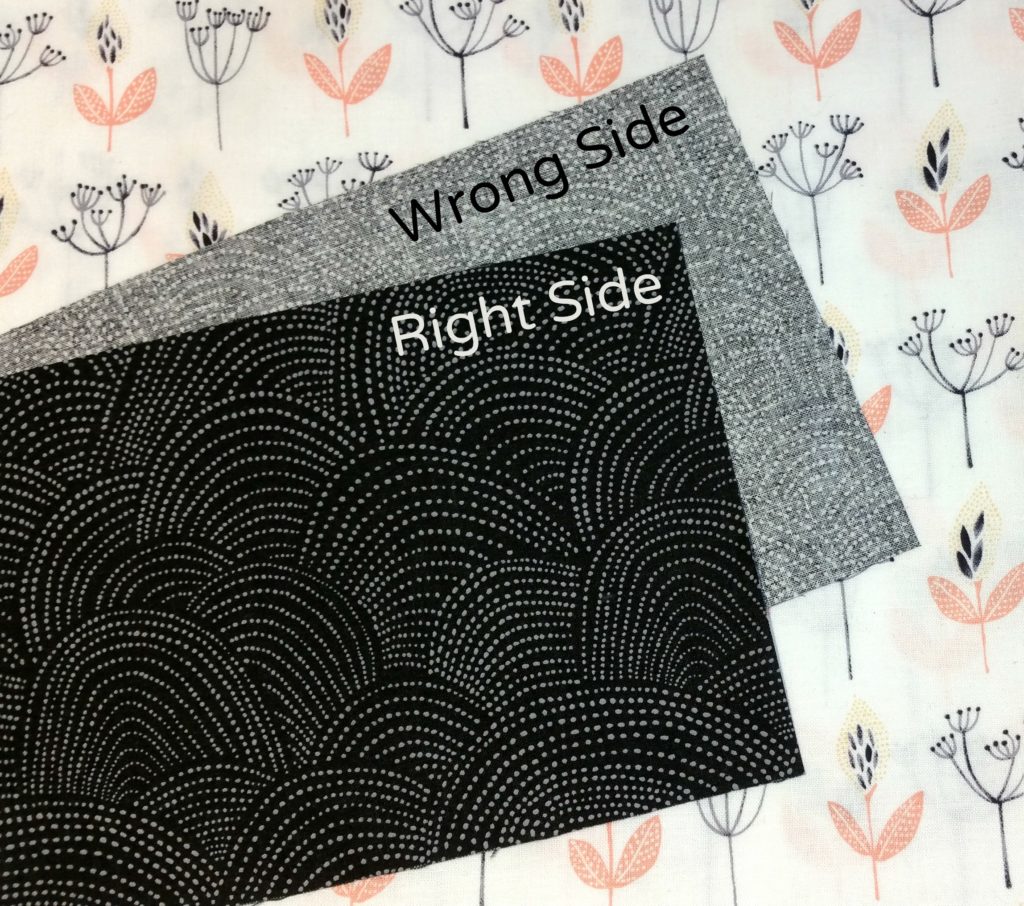
The right side side of fabric is the prettier side where you see the print design. So, when you sew “right sides together” or RST, the seam allowance ends up hidden away on the wrong side. Solid fabrics typically don’t have an obvious wrong or right side – they look identical on both sides.
Pinning
Can’t do without my glasshead pins from Dritz and my magnetic pin holder from Clover.
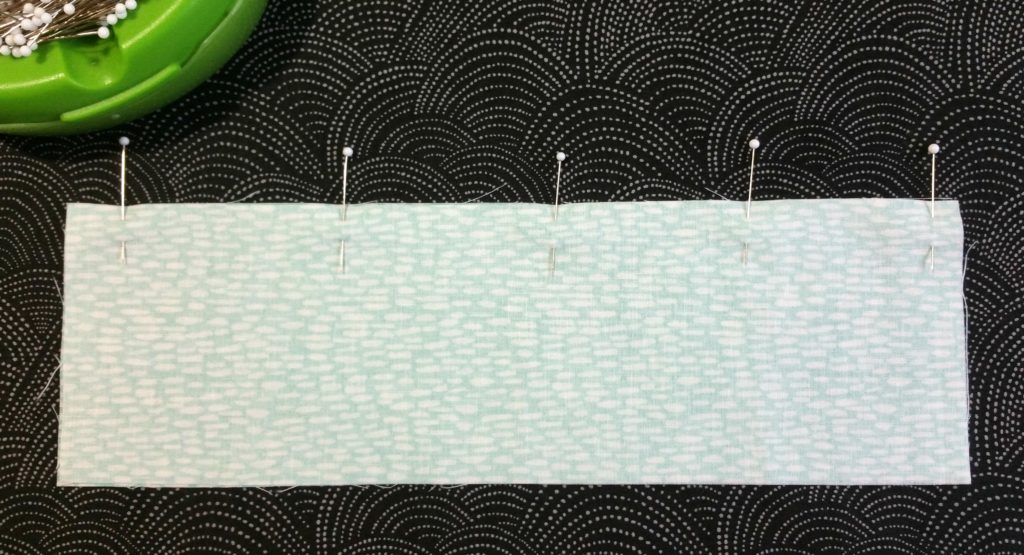
Taking the time to pin before you sew is another one of those things that helps with accuracy, especially when you’re first starting out. Pinning your layers together before sewing keeps everything nice and even and allows you to focus on your stitching rather than having to worry about keeping the pieces aligned. Make sure you insert your pins perpendicular to the edge of the fabric so they are easy to remove as you sew. And, whatever you do, do NOT sew over your pins! You could end up in a scary flying broken needle scenario and/or cause damage to your machine.
Seam Allowance
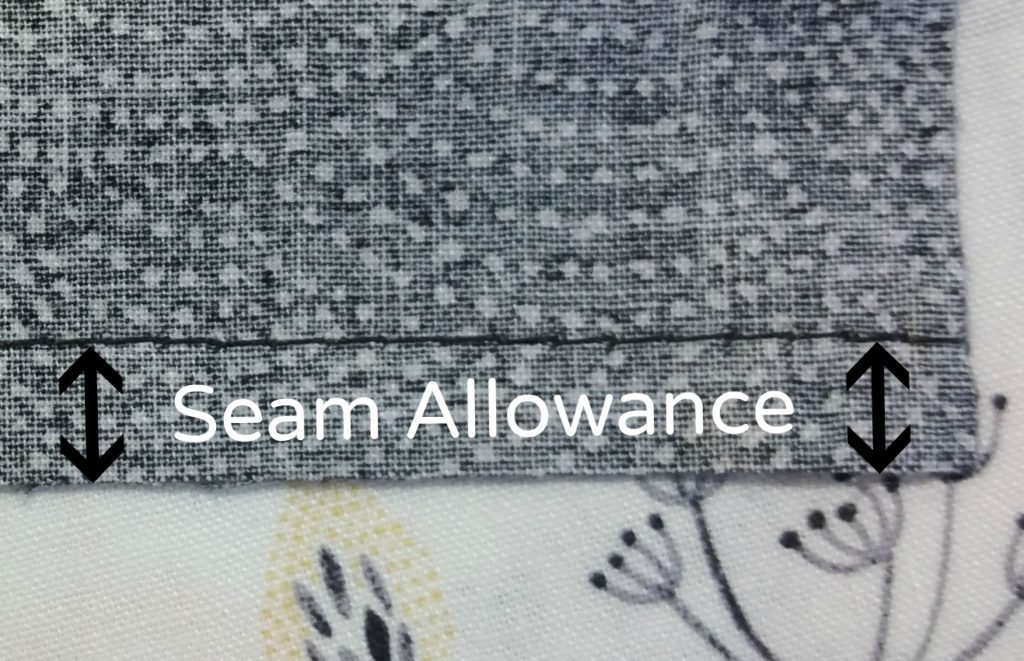
When you sew two pieces of fabric together, the area between the stitches and the edge of the fabric is called the seam allowance. The more precise your seam allowance is, the better your pieces fit together. Seriously, do not underestimate how essential an accurate seam allowance is!
The required seam allowance in bag patterns varies. The most common is 1/4″, but you will see 3/8″ and 1/2″, as well. If you don’t have a machine foot or a guideline to help with the particular seam allowance you need, no problem! Here’s an article that shows a very simple way to set up a seam guide for the seam allowance you need.
Take your time and do whatever you can to keep your seam allowance consistent. If you place importance on sewing straight and maintaining an accurate seam allowance, you will be happier in the end with your finished project. In my book, accuracy trumps speed any day of the week!
Stitch Types
An average or default stitch length is somewhere around 2.5 mm.
Basting stitches are long stitches, maybe 5 or a 6mm (or at your machine’s highest setting), used to temporarily hold layers together until the final row of stitches have been sewn. If basting stitches show once the project is finished, they can easily be removed.
Topstitching is a slightly longer stitch, maybe 3mm or so. It can be purely decorative or it can be used to secure layers together (like stitching along a zipper or hemming a pocket edge).
Backstitching or lockstitching is when you sew forward and backward a few stitches at the beginning and end of your seams to keep them from unraveling.
Fear no Zipper
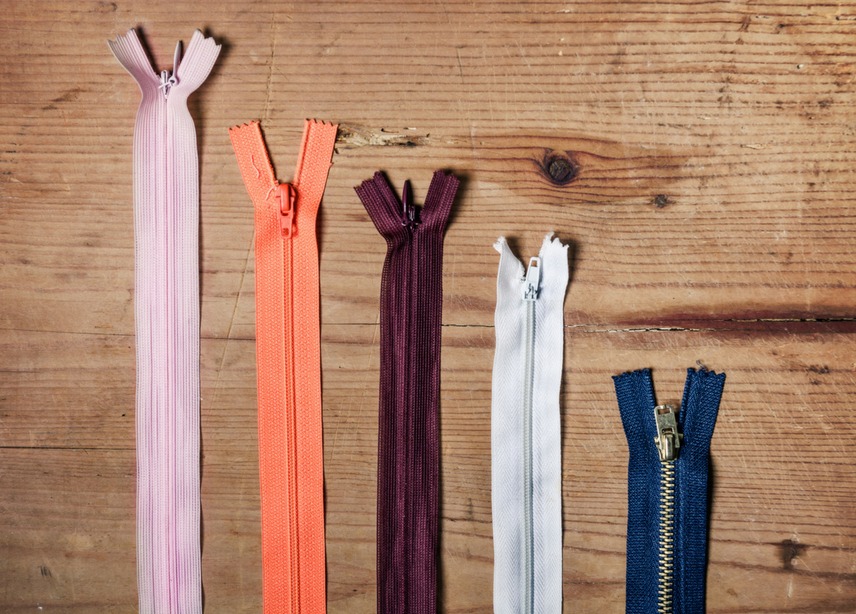
Zippers have been known to intimidate a sewist or two. I’m here to tell you, though, they really aren’t anything to be afraid of. After you’ve tackled a couple of projects with zippers, you’ll see how fun they are to work with and they won’t be at all scary!
After you’ve picked out the perfect colored zipper for your project, be sure you test it out before any sewing takes place. Simply open and close it a few times. I can tell you from personal experience how sad it is to finish a zipper pouch only to discover the zipper is junk.
If your zipper won’t lay flat because it was folded inside a package, you can try spraying it with a little water or Best Press and press it flat (with the teeth side down) using a pressing cloth. Be careful not to allow your iron to come into direct contact too long with your zipper or the teeth may melt!
Interfacing {Shape Flex SF-101}
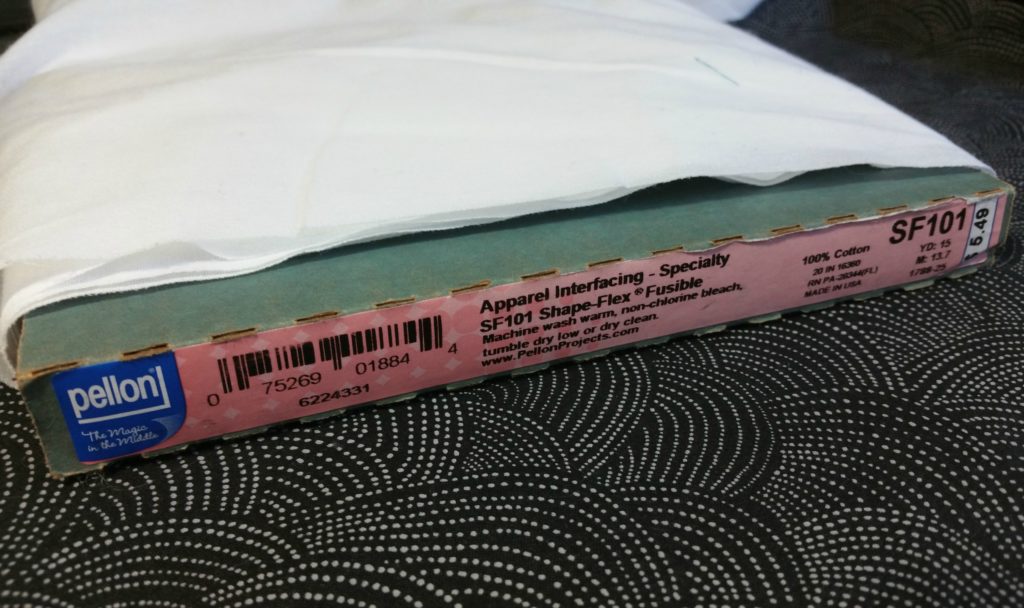
I use Shape Flex so often, I purchase it by the bolt when it goes on sale!
Shape Flex by Pellon (SF-101) is a mid-weight fusible woven interfacing and it’s magical. When fused to quilting cotton, it gives a perfect amount of body or structure to the fabric without making it thick and difficult to work with. On small bags, you can fuse it to either the lining or the exterior. Or, you may decide to fuse it to both. The thing I love most about this product is that it doesn’t make the fabric crunchy, dimpled, or wrinkly. It moves with the fabric… well, like magic.
If you’ve never used Shape Flex, be sure to look over the manufacturer’s instructions it comes with before attaching it to your fabric. You’ll likely develop your own fusing technique the more you work with it, though. Here’s what works for me:
The bumpy side of Shape Flex is the fusible side with the glue. I place my fabric wrong side up with the interfacing bumpy side down on top of it. Never let your iron come into direct contact with the glue or you will have a mess on your hands. I spray it very lightly with water and, starting from the middle, I slowly press (not iron!) the interfacing away from the center toward each side. This prevents the Shape Flex from wrinkling. Once I’m sure there are no wrinkles, I start on one end and press for about 10 seconds before moving to the next spot, overlapping each area as I go. I let the fabric cool a bit before proceeding so I can be sure the interfacing is completely fused to the fabric before proceeding.
Take Care of Your Machine
{so it takes care of you}
Love Your Machine (by taking care of it!)
Unfortunately, you can’t sew and sew to your heart’s content without considering the maintenance of your sewing machine. Well, you can, but you’re likely to regret it. To keep your sewing experiences on the happy side, keep your machine covered when not in use and clean it between projects. Don’t underestimate the usefulness of your owner’s manual, but like with most things, it’s likely there are tutorials online you can take advantage of. In addition to regular cleaning, it’s also a good idea to take your machine in to your local dealer once a year for a deep cleaning and an overall checkup.
Change your needles often, too. They say to do this every 4-5 hours of sewing. I have a hard time remembering this rule, so I simply try to change it out every project or every other project depending on how extensive the construction is. Sharp needles make everything better.
So… there you go! This list is a teeny tip of the iceberg, but what I’ve included would be the top things I’d share with a friend who is new to sewing.
The fabric in these photos are all from the Desert Bloom line by Rae Ritchie for Dear Stella.